

How To Install Vinyl Cove Base
Materials Needed to Install Vinyl Wall Base
- Enough linear feet of vinyl wall base, for your project. Factor in effectually 5-x% chip.
- Utility knife
- Wall base adhesive
1 x 30 oz. cartridge is good for 60 linear feet of base
1 10 Quart of base adhesive is good for 60 linear feet of base
one x Gallon of base adhesive is skilful for 240 linear feet of base
- Application equipment, for applying base adhesive
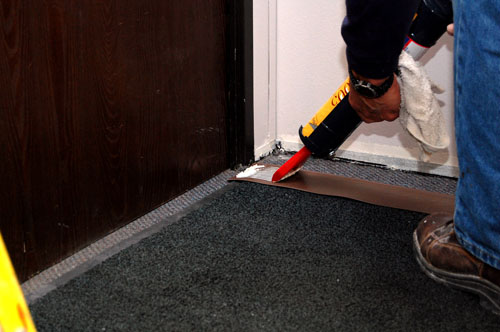
method A - cartridge gun and snozzle (pictured)
method B - cartridge gun and spreader
method C - spreader with a tub of agglutinative (either one quart or 1 gallon tub)
- Speed foursquare (optional)
- Cutting surface (whatsoever chip piece of wood)
- Moisture rag

Steps to Install Vinyl Wall Base
- Barrel the end of the ringlet up to the wall.
- Unroll the roll of vinyl wall base the length of the wall, in order to estimate the length.
- Mark where to make your cut, just give yourself a couple extra inches.
- Make a square cut.

- You should now have an unrolled length of dry out dorsum vinyl wall base of operations that is roughly the length of the wall.

- Brand sure that the toe of the vinyl wall base is towards the wall with the finished side down, significant the ribbed side is up.

- For these instructions nosotros will apply the adhesive gun and the xxx oz. agglutinative cartridge with the snozzle zipper.
- You can accomplish the same application of agglutinative with the gun and spreader, or the spreader with a tub of adhesive.
- Puncture the adhesive cartridge with needle on the adhesive gun.
- Insert cartridge into the guy and apply the snozzle.
- Begin pulling the trigger of the adhesive gun to push agglutinative through the snozzle.
- Once adhesive is coming through the snozzle, nosotros are ready to apply the adhesive to the vinyl wall base. With a polish consequent pressure, pull the gun trigger to apply adhesive on the vinyl wall base.
- Slowly and steadily work your manner down the length of the wall.

- End that downwardly the entire length of the vinyl wall base of operations.
- We should at present have a piece of base that has adhesive, side up, the entire length of the wall.
- Go dorsum to the starting edge and brainstorm to press the adhesive side of the base of operations to the wall. Printing firmly.

- Printing firmly downward the unabridged length of the base.

- Clean up and wipe downwardly the excess adhesive with a moisture rag.
- Run the wet rag downwards the entire length of the base.

- There should be some excess base of operations at the 2d end of the wall. Using your speed foursquare, cut off the excess.

- Congrats! y'all should at present have an unabridged wall length of vinyl wall base of operations installed.

- At present, the hard role, finish an inside corner. Cutting a length of base of operations the correct size, leaving some fleck, like you did before in the instructions.
- On the side that will make an inside corner, apply your speed foursquare to cut the toe of the base at a 45 degree angle.

- Cut with utility knife.

- Apply agglutinative.
- Butt the side of base with the 45 taken out of it, against the wall.

Congrats! You lot have finished an inside corner.
Source: https://www.wallprotex.com/inspiration/how-to-install-vinyl-wall-base
0 Response to "How To Install Vinyl Cove Base"
Post a Comment